
Short Engineering Answer
Heat set inserts fail in thin wall 3D printed parts when there is not enough surrounding plastic to support the insert under installation pressure, screw preload, torque, pull-out load, or repeated assembly.
A heat set insert needs more than a hole. It needs surrounding material that can flow around the knurling during installation and then resist radial stress, axial load, and screw torque during use. In thin wall parts, that support is limited. The wall may deform, crack, split, delaminate, or allow the insert to loosen, spin, or pull out.
Thin wall failure is usually a boss support and load path problem, not simply an insert size problem.
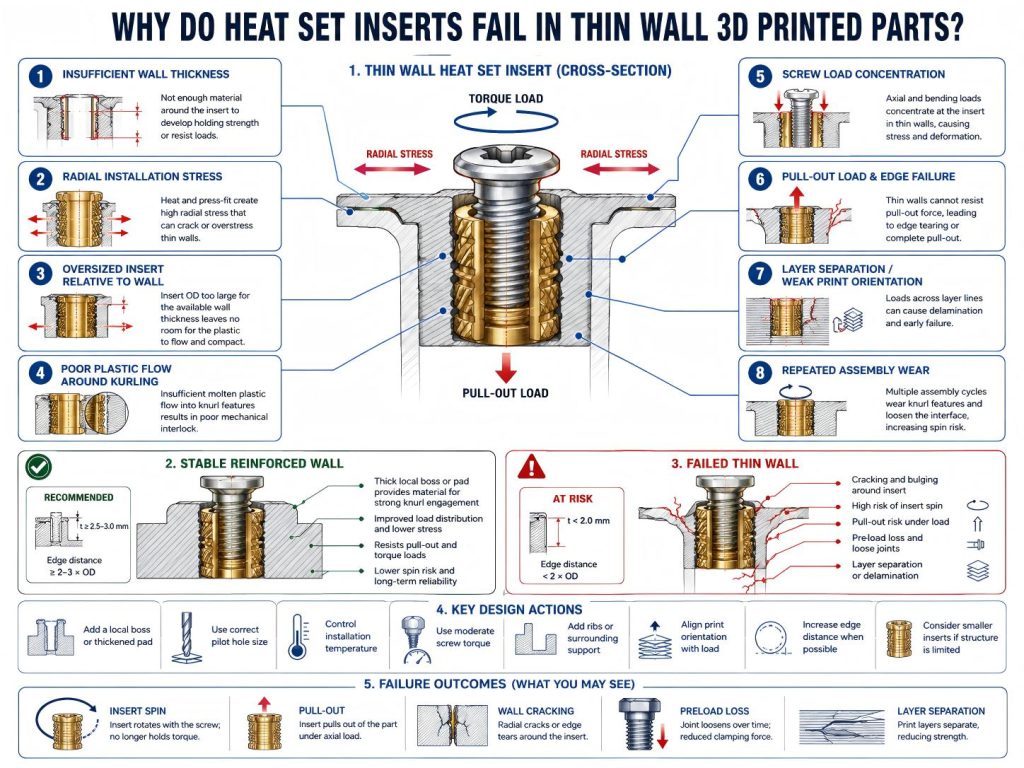
Root Causes
Not Enough Wall Thickness Around the Insert
The most common problem in thin wall parts is insufficient material around the insert.
During installation, the heated insert pushes softened plastic outward. If the wall is too thin, the plastic has nowhere to distribute the pressure. The wall may bulge, crack, or lose shape.
Even if the insert appears seated, the wall may not provide enough radial support for long-term torque resistance or pull-out strength.
A correct pilot hole cannot fully compensate for a thin wall that cannot support the insert.
Radial Stress During Installation
Heat set insert installation creates radial stress.
The insert displaces plastic as it enters the hole. In a thick boss, that stress can be contained by surrounding material. In a thin wall, the stress may concentrate at the outer surface and cause splitting, surface bulging, or local deformation.
This is especially common when the pilot hole is too small, the insert outer diameter is too large for the wall, or the insert is forced in before the plastic flows properly.
Oversized Insert Relative to Wall Thickness
A larger insert does not always make a stronger joint.
If the insert diameter is too large relative to the wall or boss thickness, the remaining plastic around the insert becomes too thin. This reduces both installation strength and service load capacity.
The insert may have strong metal threads, but the printed wall around it may be too weak to hold the insert under screw load.
In thin wall parts, insert size must be matched to available structure.
Poor Plastic Flow Around Knurling
Heat set inserts rely on softened plastic flowing around the knurled or textured outer surface.
In thin wall parts, there may not be enough plastic volume to form a strong mechanical lock. If the wall is also under-supported, the softened plastic may move outward or collapse instead of wrapping around the insert.
This can reduce torque resistance, pull-out strength, and long-term stability.
Screw Load Concentration
Thin wall parts often concentrate screw load into a small region.
When the screw is tightened, the preload must travel through the insert into the printed wall or boss. If the wall is thin, the load may not spread into the surrounding structure. This can cause local compression, cracking, deformation, or preload loss.
Thin walls are especially sensitive to over-tightening because there is less material to absorb the clamping force.
Pull-Out Load and Edge Failure
Thin walls usually have limited axial retention.
If the screw applies pull-out force, the insert may tear through the surrounding material or split the wall. This is more likely when the insert is close to an edge, the wall is printed with weak layer orientation, or the insert depth is shallow.
Pull-out strength depends on the printed structure around the insert, not only on the insert itself.
Layer Separation
Thin wall parts are more sensitive to print orientation and layer adhesion.
If screw load or insert pressure acts across weak layer lines, the wall may delaminate around the insert. This can appear as splitting, cracking, or the insert pulling out with layers attached.
Heat set inserts improve thread durability, but they do not remove the anisotropic strength limits of FDM printed walls.
Repeated Assembly
Thin wall insert joints may weaken quickly under repeated screw removal and tightening.
Each screw cycle applies torque and preload to a small amount of plastic. Over time, the plastic-to-insert interface may wear, deform, or lose support. The insert may begin to loosen or spin even if it was stable at first.
Thin wall parts should be treated carefully if repeated service is expected.
Related Engineering Variables
Heat set insert reliability in thin wall printed parts depends on several connected variables:
- Wall thickness
- Boss wall thickness
- Insert outer diameter
- Insert length
- Insert depth
- Pilot hole size
- Edge distance
- Installation temperature
- Plastic flow around knurling
- Screw tightening torque
- Screw engagement length
- Pull-out load
- Torque load
- Layer adhesion
- Print orientation
- Material behavior
- Repeated assembly cycles
These variables should be evaluated together. A thin wall part may fail even when the insert is installed cleanly, because the wall does not have enough structure to carry the screw load.
Thin wall insert design is not only about fitting the insert. It is about creating enough support around the insert.
Engineering Interpretation
Heat set insert failure in thin wall parts is usually a support structure failure.
The failure may appear as:
- Insert loosening from weak radial support
- Insert spin from poor torque resistance
- Pull-out from insufficient axial retention
- Wall cracking from radial installation stress
- Boss deformation from screw preload
- Layer separation from poor load direction
- Preload loss from plastic compression or creep
These failure modes often overlap.
For example, a thin wall may deform slightly during installation. Later, screw torque reduces the plastic-to-insert grip. After repeated assembly, the insert spins or pulls out.
This is why thin wall parts often need added local bosses, ribs, thicker pads, or alternative fastening strategies.
A heat set insert is only as reliable as the printed structure around it.
How to Reduce the Risk
To reduce heat set insert failure in thin wall 3D printed parts:
- Add a local boss or thickened pad around the insert.
- Use enough wall thickness to support the insert outer diameter.
- Avoid placing inserts directly into unsupported thin walls.
- Use the correct pilot hole size.
- Avoid undersized holes that create excessive radial stress.
- Avoid oversized holes that reduce mechanical locking.
- Control installation temperature carefully.
- Avoid overheating thin walls during insertion.
- Use moderate screw torque.
- Use enough screw engagement length.
- Increase edge distance where possible.
- Align print orientation with expected screw and pull-out loads.
- Add ribs or surrounding structure to spread load.
- Consider smaller inserts when wall thickness is limited.
- Avoid repeated assembly unless the structure is designed for it.
In thin wall parts, the best fix is often not a stronger insert. It is more surrounding printed structure.
A reliable insert joint needs enough plastic to hold the insert and enough geometry to carry the load.
Related InsertGuide Pages
- How to Design Bosses for Heat Set Inserts
- M3 Heat Set Insert Boss Design for 3D Printed Parts
- Why Do Bosses Crack Around Heat Set Inserts?
- What Causes Boss Deformation Around Heat Set Inserts?
- Why Do Heat Set Inserts Pull Out of 3D Printed Parts?
- Why Do Heat Set Inserts Spin in 3D Printed Parts?
- Heat Set Insert Hole Size Guide
- Layer Adhesion and Heat Set Insert Strength in 3D Printed Parts
- Screw Engagement Length for Heat Set Inserts in 3D Printed Parts
FAQ
Can heat set inserts be used in thin wall 3D printed parts?
Yes, but only if enough local support is added around the insert. A thin wall alone often does not provide enough radial support, pull-out strength, or torque resistance.
Why do thin walls crack around heat set inserts?
Thin walls crack because the insert creates radial stress during installation and screw loading. If there is not enough surrounding plastic to contain that stress, the wall may split or deform.
Should I use a smaller insert in thin wall parts?
Sometimes. A smaller insert may reduce radial stress, but the better solution is usually to add a local boss, thicker pad, rib, or reinforced structure around the insert.