
Should pilot holes be drilled after 3D printing for heat set inserts? Not always. Heat set insert pilot holes can be printed directly if the printer, material, slicer settings, and hole tolerance are controlled. Drilling or reaming after printing can improve consistency, but it can also remove material, weaken thin walls, or create alignment problems if done poorly.
The right choice depends on how accurate the printed holes are, how sensitive the insert fit is, and whether the part needs repeatable assembly performance. For one-off prototypes, printed holes may be enough after test validation. For production-like parts or tight insert fits, post-processing the pilot hole may be useful.
The goal is not simply to drill every hole. The goal is to create a controlled pilot hole that allows the insert to seat properly, grip the plastic, resist torque, and avoid cracking the boss.
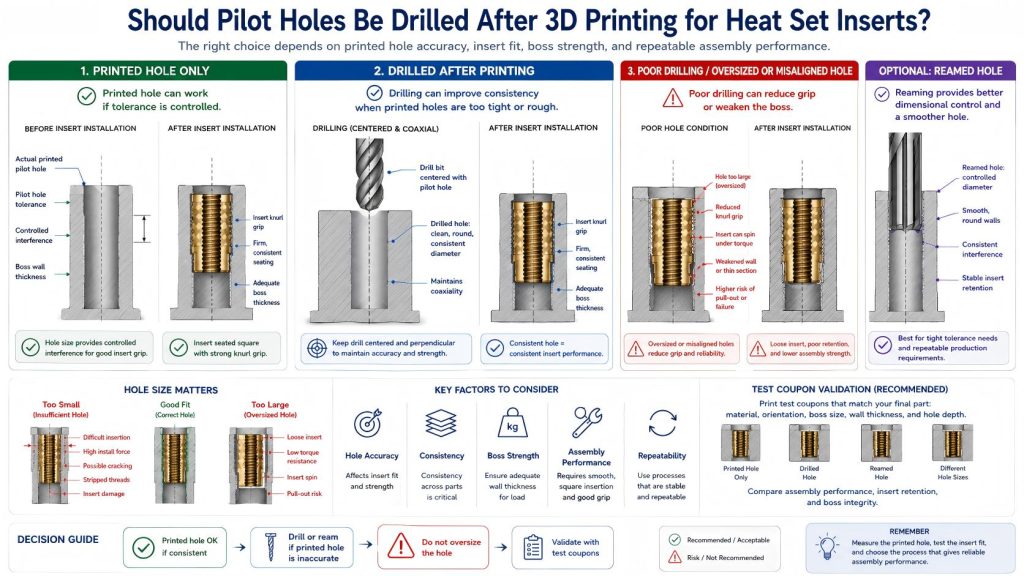
Short Answer
Pilot holes do not always need to be drilled after 3D printing. Printed holes can work if their actual size and roundness are consistent. Drilling or reaming is useful when printed holes are too small, too large, oval, rough, inconsistent, or causing insert installation failures.
Why This Question Matters
Heat set inserts depend on controlled interference between the brass insert and the printed plastic. If the hole is too large, the insert may be loose and spin under torque. If the hole is too small, the insert may require too much force and crack the boss during installation.
Because 3D printed holes often do not match the CAD diameter exactly, some designers drill or ream holes after printing. This can make the hole diameter more repeatable. But post-processing is not automatically better. It must be part of the tested insert process.
For general hole size logic, see Heat Set Insert Hole Size Guide.
When Printed Pilot Holes Can Work
Printed pilot holes can work well when the printer and material produce consistent hole dimensions. This is common in controlled workflows where the same machine, filament, slicer profile, and orientation are used repeatedly.
Printed holes may be acceptable when:
- the actual printed hole diameter is close to the intended value
- hole roundness is good enough for straight insert installation
- the insert seats fully without excessive force
- the boss does not crack or bulge during installation
- the insert does not spin when the screw is tightened
- the result is repeatable across several test samples
Printed holes are especially practical for prototypes, small parts, and low-volume assemblies where the insert fit has already been validated with test coupons.
When Drilling After Printing Is Useful
Drilling or reaming after printing can help when printed holes vary too much or consistently come out undersized. It can also help when a clean, repeatable hole diameter is needed across multiple parts.
Post-processing may be useful when:
- printed holes are consistently too small
- hole diameter varies between parts
- holes are oval or rough
- inserts are difficult to seat straight
- insertion force is cracking bosses
- different print batches produce different insert fit
- the assembly requires repeatable service performance
For tolerance behavior, see Heat Set Insert Pilot Hole Tolerance Reference for 3D Printed Parts.
Drilling vs Reaming
Drilling and reaming are not the same. Drilling is usually easier and more common, but it can wander, remove too much material, or create uneven hole walls if alignment is poor. Reaming usually provides better dimensional control, but it requires a properly sized starting hole and careful handling.
| Method | Potential Benefit | Design Risk |
|---|---|---|
| Printed hole only | Fast, simple, no extra operation | Hole size depends on printer accuracy, material, and slicer behavior. |
| Drilled after printing | Can correct undersized or rough holes | May remove too much plastic or weaken thin walls if misaligned. |
| Reamed after printing | Better diameter control and smoother hole geometry | Needs careful process control and suitable starting hole size. |
| Test coupon validation | Confirms whether post-processing is needed | Requires extra testing, but avoids hidden assembly failures. |
Why Drilling Can Sometimes Make the Joint Worse
Drilling can improve hole consistency, but it can also reduce insert retention if it removes too much plastic. A heat set insert needs plastic contact around its knurled body. If drilling oversizes the hole, the insert may not grip properly.
Drilling can also create problems in thin or weak geometry. If the boss wall is already narrow, removing additional plastic can reduce wall thickness and increase the chance of cracking, insert spin, or pull-out failure.
Drilling can make the joint worse when:
- the drill is oversized
- the drill is not aligned with the original hole
- the hole becomes too smooth and loose for the insert
- the boss wall becomes too thin
- the hole breaks through near an edge or internal cutout
- the insert no longer has enough plastic support
For wall support design, see Heat Set Insert Minimum Wall Thickness Reference for 3D Printed Parts.
When Printed Holes Are Too Small
Many 3D printed holes come out smaller than the CAD model. This can happen because of extrusion width, material flow, cooling behavior, or slicer settings. If the hole is too small, the insert may need excessive pressure during heat installation.
Signs that the printed hole may be too small include:
- the insert is difficult to start
- the insert tilts during installation
- plastic bulges around the hole opening
- the boss cracks during insertion
- the insert does not seat fully
- the thread path becomes blocked by displaced plastic
For this failure case, see Why Do Heat Set Inserts Fail When the Hole Is Too Small?.
When Printed Holes Are Too Large
If the pilot hole is too large, drilling will not solve the problem. It may make the fit even looser. An oversized hole reduces the plastic contact around the insert and can lead to insert spin, pull-out, and preload loss.
Signs that the hole may be too large include:
- the insert drops in too easily
- the insert feels loose after cooling
- the insert rotates when the screw is tightened
- the joint loses preload after repeated screw removal
- the insert pulls out under axial load
For this failure case, see Why Do Heat Set Inserts Fail When the Hole Is Too Large?.
Material Behavior Matters
The decision to drill or not drill can depend on the printed material. PLA, PETG, ABS, ASA, nylon, and filled materials respond differently to hole variation, heat, and installation pressure.
| Material | Printed Hole Behavior | Post-Processing Note |
|---|---|---|
| PLA | Often dimensionally stable, but brittle if hole is too tight | Drilling can reduce cracking risk, but avoid oversizing. |
| PETG | Can be stringy, tough, and prone to deformation | Clean post-processing may help, but preload loss still needs testing. |
| ABS | Shrinkage and warping can affect hole accuracy | Measure holes after cooling before deciding. |
| ASA | Similar to ABS with better outdoor stability | Post-processing may improve repeatability in exposed parts. |
| Nylon | Flexible and can relax around the insert | Hole fit should be tested after conditioning and repeated assembly. |
| Fiber-filled materials | Stiff and abrasive, but locally brittle | Careful drilling or reaming may help accuracy, but cracking risk remains. |
For material comparison, see PLA vs PETG vs ABS for Threaded Inserts.
Should Holes Be Printed Undersized on Purpose?
Sometimes yes. A common workflow is to print pilot holes slightly undersized, then drill or ream them to a controlled final diameter. This can improve repeatability when printed hole size varies too much.
However, this workflow should be tested. If the undersized hole is too small, the drill may wander or remove material unevenly. If the boss wall is thin, post-processing can reduce wall support. If the final hole is too large, the insert may lose grip.
Printed-undersized-then-reamed can be useful for repeatable production-like work, but it is not necessary for every prototype.
How to Decide Whether to Drill
The safest decision is based on measured holes and test inserts, not habit.
Use this decision path:
- Measure the actual printed hole diameter.
- Check hole roundness in more than one direction.
- Install inserts in several test coupons.
- Check for cracking, bulging, loose fit, or insert spin.
- If printed holes are consistent and reliable, drilling may not be needed.
- If printed holes are inconsistent or too tight, controlled drilling or reaming may help.
- If holes are too large, do not drill larger. Fix the CAD size, print process, or insert selection.
Test Coupon Method
Before deciding whether to drill production parts, print a small test coupon set. The coupon should use the same material, print orientation, wall thickness, boss diameter, hole depth, and insert size as the final part.
A useful test coupon set can compare:
- printed hole only
- printed undersized hole, then drilled
- printed undersized hole, then reamed
- slightly different hole diameters
- different materials or print orientations if needed
After installation, check seating depth, insert spin, pull-out movement, boss cracking, screw engagement, and repeated assembly behavior.
Common Mistakes
Drilling every hole automatically
Drilling is not always necessary. If the printed holes are accurate and the inserts perform well, extra post-processing may add variation instead of improving reliability.
Using the drill size as the design standard
The drill size should be validated with the actual insert and material. It should not be chosen only because it is convenient or close to the CAD diameter.
Ignoring boss wall thickness
Drilling removes plastic. In thin bosses, this can reduce the support needed for torque resistance and pull-out strength.
Fixing a loose insert by drilling
If the hole is already too large, drilling will usually make the problem worse. The design should be corrected at the CAD, slicing, or insert selection level.
Testing one hole only
One successful insert does not prove the process is reliable. Test several holes and check repeatability.
Answer Summary
Pilot holes do not always need to be drilled after 3D printing for heat set inserts. Printed holes can work when they are accurate, round, consistent, and validated by testing. Drilling or reaming is useful when printed holes are too tight, rough, inconsistent, or difficult to control.
Do not drill by default. Measure the printed hole, test the insert fit, and choose the process that gives stable seating, enough plastic grip, no boss cracking, and reliable screw performance.
Related Guides
- Heat Set Insert Pilot Hole Tolerance Reference for 3D Printed Parts
- Heat Set Insert Hole Size Guide
- M3 Heat Set Insert Hole Size for 3D Printed Parts
- Heat Set Insert Minimum Wall Thickness Reference for 3D Printed Parts
- Heat Set Insert Seating Depth Reference for 3D Printed Parts
- Why Do Heat Set Inserts Fail When the Hole Is Too Large?
- Why Do Heat Set Inserts Fail When the Hole Is Too Small?
- Heat Set Insert Installation Temperature for 3D Printed Parts
Related Decision Resources
For insert selection, tool choice, and supplier comparison, use these decision-focused references after the engineering requirements are defined.