
Heat set insert installation temperature is one of the most important process variables in reliable 3D printed fastening.
A heat set insert does not become strong simply because it is pressed into a printed hole. It becomes strong when the surrounding plastic softens, flows around the insert geometry, and cools into a stable mechanical lock.
Engineering Definition
Installation temperature is the controlled thermal condition used to soften the surrounding printed plastic during heat set insert installation.
In 3D printed parts, installation temperature affects plastic flow, insert bonding quality, boss deformation risk, layer integrity, and long-term fastening reliability.
If the installation temperature is too low, the insert may not bond properly with the plastic. If the temperature is too high, the boss may deform, the hole may enlarge, and the printed structure around the insert may lose strength.
For 3D printed parts, installation temperature is not just a tool setting. It directly affects hole quality, boss strength, layer adhesion, pull-out strength, torque resistance, and long-term insert reliability.
A good heat set insert installation process should control heat, pressure, alignment, and cooling.
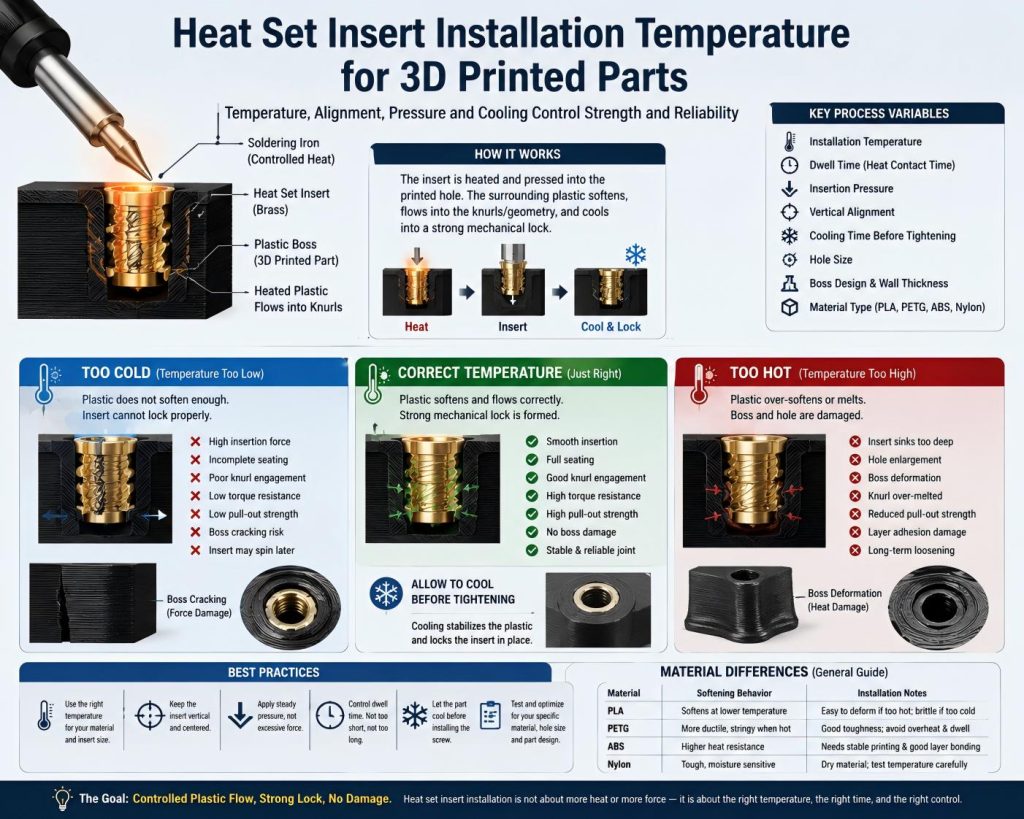
Why Installation Temperature Matters
Heat set inserts are installed by heating the metal insert and pressing it into a printed hole. The insert transfers heat into the surrounding plastic.
As the plastic softens, it flows into the insert’s knurls, grooves, or surface features. After cooling, the plastic locks the insert in place.
This mechanical lock is what gives the joint strength.
If the plastic does not soften enough, the insert may only compress or cut into the hole. The knurls will not fully engage the plastic.
If the plastic softens too much, the boss can lose shape. The insert may sink too deeply, tilt, enlarge the hole, or damage nearby layers.
The correct installation temperature creates controlled plastic flow without destroying the printed structure.
The Goal Is Plastic Flow, Not Forced Insertion
A common mistake is treating heat set insert installation as a pressing operation.
The goal is not to force the insert into the hole.
The goal is to let the plastic soften enough for the insert to move into place with controlled pressure.
When the temperature is correct, the insert should move smoothly and vertically into the boss. The plastic should flow around the insert surface features. The boss should remain stable without cracking, bulging, or collapsing.
If the insert requires excessive force, the temperature may be too low, the hole may be too small, or the boss design may be too weak.
If the insert drops too quickly or sinks below the surface, the temperature may be too high, the hole may be too large, or the dwell time may be too long.
Good installation is controlled melting, not mechanical force.
What Happens When Temperature Is Too Low
If the installation temperature is too low, the plastic may not flow properly around the insert.
This can cause several problems:
- weak knurl engagement
- low torque resistance
- poor pull-out strength
- insert spinning during screw tightening
- incomplete seating
- boss cracking due to excessive pressure
- stress concentration around the hole
A low-temperature installation may look acceptable from the outside. The insert may appear seated, and the screw may thread in normally.
However, the mechanical lock may be weak inside the boss.
This often becomes visible later when the insert spins, loosens, or pulls out under load.
Low temperature can also cause the user to apply too much force. This force can crack the boss or separate printed layers before the plastic has properly softened.
What Happens When Temperature Is Too High
If the installation temperature is too high, the plastic around the insert may over-soften.
This can cause:
- boss deformation
- hole enlargement
- insert sinking too deep
- loss of insert alignment
- weak plastic structure around the insert
- damaged layer bonding
- surface bulging
- reduced pull-out strength
- long-term loosening
Overheating is especially risky in smaller bosses or thin-wall parts.
When too much plastic softens, the insert may no longer be held by a strong local structure. Instead, it may sit inside a weakened, enlarged, or distorted hole.
A very hot insert can also damage the printed layers near the boss. This is important because the same layers must later carry pull-out and torque loads.
More heat does not always mean better strength. Too much heat can turn a precise boss into a weak melted zone.
Material Differences in Installation Temperature
Different 3D printing materials respond differently to heat set insert installation.
There is no single ideal temperature for every material, printer, insert size, and boss design.
Instead, the installation temperature should be chosen based on how the material softens and flows.
PLA
PLA softens at relatively low temperatures compared with many engineering plastics.
It is easy to install inserts into PLA, but overheating can quickly deform the boss or enlarge the hole.
PLA is also relatively brittle, so forcing an insert at too low a temperature can crack the boss.
For PLA, controlled heat and gentle insertion are important.
PETG
PETG is tougher and more ductile than PLA. It can often tolerate insert installation better without cracking.
However, PETG can become soft and stringy under heat. Too much heat or dwell time can create deformation around the boss.
PETG may also creep under long-term load, so installation quality and boss support still matter.
ABS
ABS generally has better heat resistance than PLA and can perform well with heat set inserts.
However, ABS requires controlled printing conditions. If the part already has weak layer adhesion or internal stress, insert installation can expose those weaknesses.
ABS installation usually benefits from stable heating, vertical alignment, and good boss design.
Nylon
Nylon is tough and can produce strong functional insert joints, but it is sensitive to moisture, print quality, and dimensional control.
Because nylon can behave differently depending on its moisture content and formulation, test installations are especially important.
For nylon insert joints, consistent drying, hole control, and installation process control matter as much as temperature.
Installation Temperature Relationships
| Engineering Factor | Effect on Installation Quality |
|---|---|
| Material heat resistance | Determines allowable installation temperature range |
| Plastic flow behavior | Affects bonding around the insert knurl |
| Overheating risk | Can deform surrounding boss geometry |
| Insert bonding quality | Influences pull-out and torque resistance |
| Installation consistency | Improves repeatability between assemblies |
| Layer adhesion stability | Can weaken under excessive localized heat |
| Cooling behavior | Affects final insert retention and structural stability |
Installation temperature affects not only insert placement but also long-term structural stability, bonding quality, and fastening reliability in printed assemblies.
Insert Size and Temperature Control
For a size-specific process, see M3 heat set insert installation.
Small inserts are less forgiving than large inserts.
For M2, M2.5, and M3 inserts, the surrounding boss is often small. There is less plastic available to absorb heat and stress.
A small error in temperature, hole size, or insertion pressure can cause large changes in performance.
Larger inserts have more surface area, but they also transfer more heat into the part. They may require more controlled dwell time and better support around the boss.
Installation temperature should not be considered alone. It must be matched with:
- insert size
- hole diameter
- boss wall thickness
- material type
- insertion depth
- tool contact time
- pressure
- cooling time
The correct process is a balance between heat input and structural control.
Installation Tool and Heat Transfer
The installation tool affects how heat enters the insert and the printed part.
A soldering iron is commonly used for heat set insert installation, but the tip shape matters.
A flat or insert-specific tip can transfer heat more evenly and keep the insert aligned. A poorly matched tip can tilt the insert, heat unevenly, or apply pressure off-axis.
Uneven heating can cause one side of the boss to soften more than the other side. This can lead to tilted inserts, asymmetric plastic flow, or weak locking.
For consistent installation, the tool should:
- contact the insert evenly
- keep the insert vertical
- transfer heat predictably
- avoid slipping into the internal threads
- allow controlled downward movement
The best tool setup is one that controls both heat and alignment.
Dwell Time Matters
Temperature is only one part of the process. Dwell time also matters.
Dwell time is the amount of time the heated insert remains in contact with the plastic during installation.
A higher temperature with a short dwell time may behave differently from a lower temperature with a longer dwell time.
If the dwell time is too short, the plastic may not flow fully around the insert.
If the dwell time is too long, too much heat may spread into the boss and weaken the surrounding structure.
Good installation requires enough time for local plastic flow, but not so much time that the entire boss becomes soft.
For repeatable results, operators should control both temperature and time.
Alignment During Installation
A perfectly chosen temperature cannot fix poor alignment.
If the insert enters the hole at an angle, the boss may be damaged even if the heat is correct.
Misalignment can cause:
- uneven plastic flow
- tilted insert threads
- reduced screw engagement
- local boss cracking
- poor torque resistance
- difficult assembly
- cosmetic surface defects
The insert should be pressed straight into the boss along the hole axis.
For production or repeatable builds, an installation fixture, arbor press, drill press guide, or controlled vertical setup can improve consistency.
Hand installation can work, but it requires careful control.
Cooling Before Screw Tightening
After the insert is installed, the plastic around it must cool and solidify.
If a screw is tightened before the plastic has fully cooled, the insert may move, rotate, sink deeper, or disturb the forming mechanical lock.
Cooling is part of the installation process.
The insert area should return to a stable state before assembly load is applied.
For functional parts, especially repeated-use joints, allowing sufficient cooling time improves consistency and reduces early loosening.
The joint is not finished when the insert reaches final depth. It is finished when the plastic has cooled into a stable structure.
Signs of Poor Installation Temperature
There are several visible signs that the installation temperature may be wrong.
Possible signs of low temperature include:
- insert does not seat fully
- excessive force is required
- boss cracks during insertion
- insert sits high above the surface
- insert spins later during tightening
Possible signs of high temperature include:
- insert sinks too deep
- boss surface bulges
- hole becomes enlarged
- insert tilts easily
- melted plastic rises around the insert
- boss feels soft or distorted
- insert loosens after cooling
Not all problems are visible immediately. Some installation defects only appear after screw tightening or mechanical loading.
This is why test samples are useful.
How to Find a Good Installation Temperature
A good installation temperature is best found by testing with the actual material, insert size, hole size, and boss design.
A simple test can compare:
- different temperatures
- different hole diameters
- different insert depths
- different boss wall thicknesses
- different materials
- different cooling times
The goal is to find a process that produces:
- smooth insertion
- complete seating
- no boss cracking
- no excessive bulging
- good vertical alignment
- strong torque resistance
- good pull-out resistance
- stable performance after cooling
For functional parts, a small test matrix can prevent many assembly failures later.
Practical Installation Principle
Heat set insert installation temperature should not be treated as a fixed number copied from a general chart.
It should be treated as a controlled process variable.
The right temperature depends on how the printed plastic responds during installation.
A good installation process creates three things:
- enough heat for plastic flow
- enough structure to support the insert
- enough control to avoid damage
The insert should not be cold-pressed into the part.
The boss should not be melted into a weak zone.
The plastic should flow, reform, and cool around the insert features.
For reliable 3D printed fastening, the better question is not only:
What temperature should I use?
The better question is:
Does this temperature create controlled plastic flow without weakening the printed boss?
That is the engineering core of heat set insert installation.
Related Engineering Factors
For a size-specific process, see M2.5 heat set insert installation.
Installation temperature directly affects how heat set inserts interact with the surrounding printed plastic during assembly.
Important related engineering factors include:
- material heat resistance
- thermal softening behavior
- plastic flow around the knurl
- insert bonding quality
- boss deformation risk
- overheating damage
- pull-out strength
- torque resistance
- layer adhesion stability
- installation consistency
Incorrect installation temperatures can lead to weak insert retention, softened surrounding structures, dimensional distortion, or long-term reliability problems.
Related engineering guides:
- How to Choose Heat Set Inserts for 3D Printed Parts
- Heat Set Insert Hole Size Guide
- How to Design Bosses for Heat Set Inserts
- PLA vs PETG vs ABS for Threaded Inserts
- Why Heat Set Inserts Fail in 3D Printed Parts
- Pull-Out Strength of Heat Set Inserts in 3D Printed Parts
- Torque Resistance of Heat Set Inserts in 3D Printed Parts
- Layer Adhesion and Heat Set Insert Strength in 3D Printed Parts
FAQ
What temperature should I use for heat set inserts in 3D printed parts?
There is no single correct temperature for every 3D printed part. The best heat set insert installation temperature depends on the material, insert size, hole diameter, boss design, tool type, and dwell time. Test with the actual printed part and adjust until the insert seats smoothly without cracking or overheating the boss.
What happens if the heat set insert temperature is too low?
If the temperature is too low, the plastic may not flow properly around the insert knurls. This can cause weak mechanical locking, poor torque resistance, low pull-out strength, incomplete seating, boss cracking from excessive pressure, or insert spinning during screw tightening.
What happens if the heat set insert temperature is too high?
If the temperature is too high, the plastic around the insert may over-soften. This can deform the boss, enlarge the hole, cause the insert to sink too deeply, damage nearby layers, reduce pull-out strength, or create long-term loosening.
Should I tighten the screw immediately after installing a heat set insert?
No. The plastic around the insert should be allowed to cool and solidify before screw tightening. Tightening too early can disturb the mechanical lock, rotate the insert, change its depth, or weaken the surrounding plastic structure.
Is installation temperature different for PLA, PETG, ABS, and Nylon?
Yes. PLA, PETG, ABS, and Nylon soften and flow differently during heat set insert installation. PLA is easier to deform with too much heat, PETG can become soft and stringy, ABS needs stable print quality and layer bonding, and Nylon requires careful control of moisture, temperature, and hole dimensions.
Related Engineering Guides
- Ngineering Guides for 3D Printed Fastening
- 3D Printing Fastening FAQ
- 3D Printed Fastening Applications
- How to Choose Heat Set Inserts for 3D Printed Parts
- Heat Set Insert Hole Size Guide
- How to Design Bosses for Heat Set Inserts
- PLA vs PETG vs ABS for Threaded Inserts
- Why Heat Set Inserts Fail in 3D Printed Parts
- Pull-Out Strength of Heat Set Inserts in 3D Printed Parts
- Torque Resistance of Heat Set Inserts in 3D Printed Parts
- Layer Adhesion and Heat Set Insert Strength in 3D Printed Parts
- Screw Engagement Length for Heat Set Inserts in 3D Printed Parts
Related Decision Resources
When selecting installation temperature and tooling in real applications, consider installation tools and kits with best heat set insert options after the material softening range, insertion control, and depth risk are defined.