
M2.5 heat set insert installation requires more control than larger insert sizes because the pilot hole, boss wall thickness, seating depth, installation heat, and insertion alignment all have less room for error.
M2.5 inserts are commonly used in compact 3D printed assemblies such as electronics housings, small covers, sensor mounts, lightweight brackets, PCB supports, compact mechanisms, and thin-wall printed parts. They are stronger and easier to handle than M2 inserts, but still small enough that installation mistakes can quickly lead to cracked bosses, tilted inserts, weak pull-out strength, or insert spin during screw tightening.
This guide explains how to install M2.5 heat set inserts in 3D printed parts and how installation quality affects hole fit, boss cracking, torque resistance, pull-out strength, material behavior, and repeated assembly reliability.
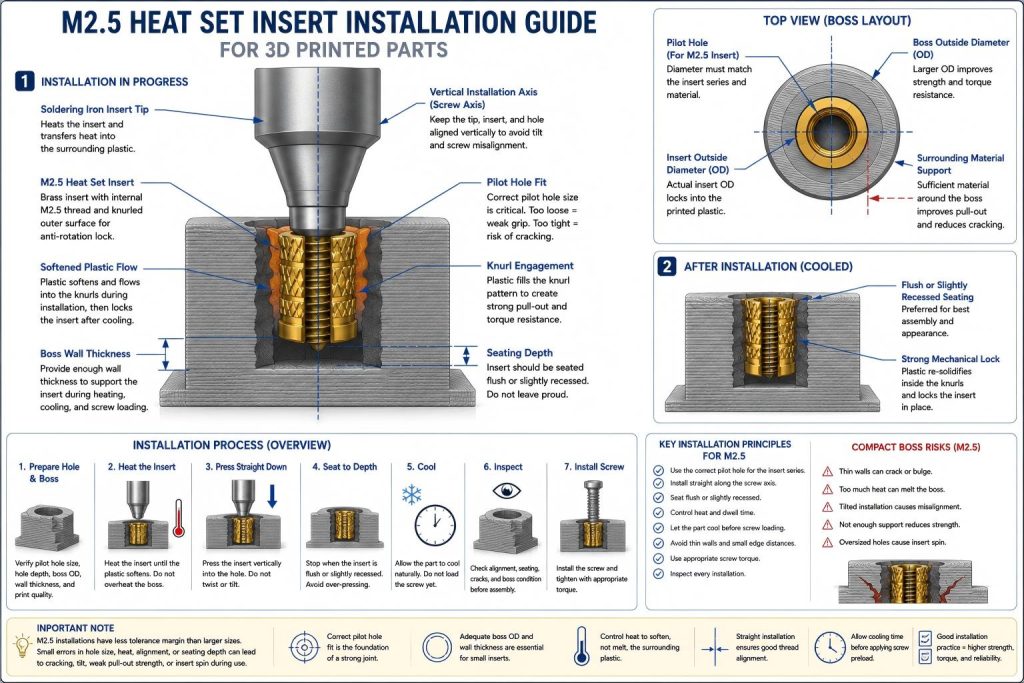
Engineering Overview
Installing an M2.5 heat set insert means heating the brass insert so the surrounding plastic softens and flows into the knurled surface. After cooling, the plastic should lock around the insert and resist screw preload, pull-out force, and rotational torque.
For M2.5 inserts, installation accuracy is especially important. Compared with M3 and M4 inserts, M2.5 inserts are smaller, have less insert surface area, and are often placed in compact bosses or thin printed sections. A small error in pilot hole diameter, heat dwell time, or insertion angle can have a large effect on final performance.
A reliable M2.5 installation depends on the full design system: M2.5 heat set insert hole size, M2.5 boss design, insert dimensions, material choice, installation heat, seating depth, and screw tightening practice.
Typical Installation Factors for M2.5 Heat Set Inserts
The table below summarizes the main installation variables for M2.5 heat set inserts. These are engineering starting points, not universal settings. Actual installation behavior depends on insert series, knurl geometry, printed material, printer calibration, hole tolerance, installation tool, and boss design.
| Installation Variable | Effect on M2.5 Insert Performance | Risk if Poorly Controlled | Engineering Note |
|---|---|---|---|
| Pilot Hole Diameter | Controls how much plastic flows into the insert knurls | Oversized holes reduce grip; tight holes can crack small bosses | M2.5 holes need tighter process control than larger sizes. |
| Hole Depth | Allows the insert to seat fully without bottoming out | Shallow holes may leave the insert proud or force plastic upward | Small inserts still need enough depth for displaced plastic. |
| Installation Heat | Softens the plastic around the insert | Too little heat requires force; too much heat melts the boss | Heat control is critical because the boss has limited plastic volume. |
| Heat Dwell Time | Controls how long the insert transfers heat into the boss | Excessive dwell can collapse or deform compact bosses | Stop once the insert reaches final seating depth. |
| Insertion Alignment | Keeps the insert vertical and aligned with the screw axis | Tilted inserts cause screw binding and weak knurl engagement | Small inserts are easy to tilt during freehand installation. |
| Seating Depth | Determines whether the insert sits flush, proud, or recessed | Proud inserts interfere with mating parts; shallow seating reduces strength | Flush or slightly recessed seating is usually preferred. |
| Boss Wall Thickness | Supports the insert during heating, cooling, and screw loading | Thin walls may crack, bulge, or soften during installation | M2.5 bosses need enough wall even in compact designs. |
| Cooling Time | Allows plastic to re-solidify around the insert | Loading the screw too soon may disturb the insert position | Let the plastic cool before applying screw preload. |
| Post-Installation Inspection | Checks alignment, seating, and boss condition | Small tilt or cracking may not be obvious until assembly | Inspect every M2.5 insert before repeated use. |
Recommended M2.5 Installation Process
1. Confirm the Insert Series and Pilot Hole
Before installation, confirm the actual insert outside diameter, length, knurl pattern, and recommended pilot hole range. M2.5 inserts from different series can vary in geometry, even when the thread size is the same.
Do not design the hole only from the M2.5 thread size. The threaded hole inside the insert is not the same as the outside body that must lock into the printed plastic. For geometry checks, see the M2.5 heat set insert dimensions reference.
2. Check the Boss Before Heating
Inspect the boss before installing the insert. Check boss outside diameter, wall thickness, edge distance, print quality, and whether the boss is supported by enough surrounding material.
M2.5 inserts are often used in compact parts, so the boss may be thin or close to an edge. If the boss is too small, installation heat and pressure can cause cracking, bulging, or local deformation even before the screw is installed.
For structural support checks, compare the design with the boss OD ratio and minimum wall thickness references.
3. Use a Small, Centered Installation Tip
A soldering iron with a suitable insert tip is commonly used for heat set insert installation. For M2.5 inserts, the tool should be small enough to contact the insert cleanly without touching or damaging the surrounding boss surface.
The tip should apply heat along the insert axis. A large, uneven, or off-center tip can tilt the insert or overheat one side of the boss. This is more risky with M2.5 than with larger inserts because the boss and insert have less margin for misalignment.
4. Press Straight Down Without Twisting
Press the insert vertically into the pilot hole. Do not twist, rock, drag, or push sideways during installation. A tilted M2.5 insert can cause screw misalignment, weak engagement, and uneven load transfer.
If the insert resists movement, do not solve the problem by applying more force. The pilot hole may be too small, the insert may not be hot enough, or the tool may not be aligned with the screw axis.
5. Stop at the Correct Seating Depth
For most M2.5 printed assemblies, the insert should sit flush or slightly recessed below the boss surface. A proud insert can prevent mating parts from sitting flat. An overly deep insert may reduce screw engagement or create assembly stack-up problems.
Do not keep heating after the insert reaches final depth. Extra heat dwell can soften too much plastic around the insert and reduce both M2.5 pull-out strength and M2.5 torque resistance.
6. Let the Insert Cool Before Loading
After installation, allow the insert and surrounding boss to cool before inserting the screw or applying preload. If the screw is installed too soon, the insert may shift or disturb the softened plastic around the knurls.
Cooling time is especially important for PETG and ABS, which may remain soft near the insert longer than expected. For small M2.5 bosses, even a small shift can affect screw alignment.
7. Inspect the Installation
After cooling, inspect the insert from the top and side if possible. Check whether the insert is straight, flush or slightly recessed, and surrounded by intact plastic.
Look for cracks, stress whitening, bulging, melted plastic, tilted seating, and raised material around the boss. For compact assemblies, also test whether the mating part sits flat and whether the screw enters smoothly without binding.
Material Adjustments for PLA, PETG, and ABS
PLA
PLA can provide good initial grip for M2.5 inserts because it is stiff and holds detail after cooling. However, PLA is also brittle, and small bosses are vulnerable to cracking.
For PLA, avoid tight pilot holes and excessive insertion force. If the insert does not enter smoothly, check the hole size, tool alignment, and heat level before pressing harder. PLA M2.5 boss failures often show stress whitening, fine cracks, or sudden splitting.
PETG
PETG is tougher and more forgiving during installation, which can reduce immediate cracking. However, PETG can soften more noticeably during heating and may relax under screw preload over time.
For PETG, avoid excessive heat dwell and allow enough cooling time before assembly. M2.5 inserts in PETG may feel secure at first but loosen after repeated screw cycles if the boss is thin or the screw is over-tightened.
ABS
ABS can work well with M2.5 heat set inserts when installation heat is controlled and the printed boss has good layer adhesion. ABS usually handles heat better than PLA, but it can still soften too much if the insert is overheated.
For ABS, avoid long heat dwell, tilted installation, and weak boss bases. The insert should seat cleanly without creating a large softened pocket around the brass body.
Common M2.5 Installation Mistakes
1. Oversized Pilot Hole
An oversized pilot hole makes installation easy but reduces plastic engagement with the insert knurls. In M2.5 assemblies, this can quickly lead to weak pull-out strength or insert spin because the insert has limited surface area.
2. Hole Too Tight
A tight hole may seem stronger, but it can crack a small boss during installation. This is especially common in PLA or in thin-wall printed parts where there is not enough material around the insert.
3. Too Much Heat
Too much heat can collapse or soften the small boss around the insert. The insert may sink too easily, tilt, or sit in a melted pocket that does not provide a clean mechanical lock after cooling.
4. Too Little Heat
If the insert is not hot enough, it may require excessive force to enter the hole. This can crush the boss, split the printed layers, or stop the insert before it reaches final seating depth.
5. Tilted Installation
A tilted M2.5 insert can cause screw binding and uneven load transfer. Because the insert is small, even a slight angle may create visible assembly problems when the mating part is installed.
6. Shallow Seating
Shallow seating reduces engagement length and may leave the insert proud of the surface. This can interfere with covers, panels, and small mating parts.
7. Loading the Insert Too Soon
Installing a screw before the plastic has cooled can disturb the insert position. In small M2.5 bosses, even slight movement can weaken the knurl engagement or misalign the screw axis.
Post-Installation Checks
After installing an M2.5 heat set insert, check the following before final assembly:
- The insert is straight and aligned with the screw axis.
- The insert is flush or slightly recessed.
- The boss is not cracked, split, or stress-whitened.
- The surrounding plastic is not excessively melted or bulged.
- The screw enters smoothly without binding.
- The mating part sits flat against the printed surface.
- The insert does not rotate under normal screw tightening.
- The boss has enough wall thickness for repeated use.
How Installation Affects Pull-Out and Torque Resistance
Installation quality directly affects both axial and rotational performance. Pull-out strength depends on how well the insert engages the plastic along its length. Torque resistance depends on how well the plastic locks around the insert knurls and resists rotation during screw tightening.
For M2.5 inserts, the margin is smaller than for M3 or M4. A slightly oversized hole, shallow seating depth, overheated boss, or tilted insert can noticeably reduce joint reliability.
If the assembly will be opened repeatedly, the installation must be clean and consistent. Repeated screw cycles can expose small weaknesses in hole fit, material creep, or torque resistance.
When M2.5 Installation Is Usually Reliable
- The pilot hole matches the actual insert series.
- The boss has enough outside diameter and wall thickness.
- The insert is installed vertically without twisting or rocking.
- The installation heat is controlled and not excessive.
- The insert is seated flush or slightly recessed.
- The part is allowed to cool before screw loading.
- The screw tightening torque is appropriate for a small insert.
- The insert is not placed too close to an unsupported edge.
When M2.5 Installation Is Likely to Fail
- The boss is very thin or too close to an edge.
- The pilot hole is oversized or poorly calibrated.
- The insert is forced into cold or underheated plastic.
- The insert is overheated and sinks into a melted pocket.
- The insert is installed at an angle.
- The material is brittle, poorly printed, or has weak layer adhesion.
- The screw is tightened too hard for the boss size.
- The joint is opened and closed frequently without enough boss support.
Related Engineering Guides
- M2.5 Heat Set Insert Dimensions Reference for 3D Printed Parts
- M2.5 Heat Set Insert Hole Size for 3D Printed Parts
- M2.5 Heat Set Insert Boss Design for 3D Printed Parts
- M2.5 Heat Set Insert Pull-Out Strength for 3D Printed Parts
- M2.5 Heat Set Insert Torque Resistance for 3D Printed Parts
- M2.5 Heat Set Insert Failure Modes in 3D Printed Parts
- Heat Set Insert Installation Temperature for 3D Printed Parts
- Heat Set Insert Hole Depth Chart for 3D Printed Parts
- Heat Set Insert Seating Depth Reference for 3D Printed Parts
- Heat Set Insert Pilot Hole Tolerance Reference for 3D Printed Parts
- PLA vs PETG vs ABS for Threaded Inserts
FAQ
How do you install M2.5 heat set inserts in 3D printed parts?
Install M2.5 heat set inserts by using a correctly sized pilot hole, heating the insert with a controlled soldering iron tip, pressing it straight into the boss, stopping at the correct seating depth, and allowing the plastic to cool before applying screw load.
Why do M2.5 heat set inserts tilt during installation?
M2.5 inserts can tilt if the soldering iron tip is off-center, the pilot hole is misaligned, the insert starts at an angle, or one side of the small boss softens faster than the other.
Should an M2.5 heat set insert sit flush or recessed?
For most 3D printed assemblies, an M2.5 insert should sit flush or slightly recessed. A proud insert may interfere with mating parts, while an overly deep insert may reduce screw engagement.
Why does an M2.5 insert spin after installation?
An M2.5 insert may spin if the pilot hole is oversized, the insert was overheated, the knurls did not engage enough plastic, the boss wall is too thin, or the screw was tightened too hard for the small boss.
Is M2.5 installation harder than M3 installation?
M2.5 installation usually has less tolerance margin than M3 installation. The insert and boss are smaller, so small errors in hole size, alignment, heat dwell, or screw torque can have a larger effect on final reliability.
Related Decision Resources
For insert selection, tool choice, and supplier comparison, use these decision-focused references after the engineering requirements are defined.