
Heat set insert hole depth is one of the most important dimensions in 3D printed fastening design. If the hole is too shallow, the insert may sit proud of the surface, bottom out before it is fully seated, or push molten plastic into the thread. If the hole is too deep without enough material below the insert, the boss may become weak or the screw may bottom out in the printed cavity.
This hole depth chart explains how to think about heat set insert hole depth for M2, M2.5, M3, M4, and M5 inserts in 3D printed parts. It covers insert length, boss depth, screw engagement, bottom clearance, blind holes, through holes, and common depth-related failure modes.
Heat set insert hole depth is not universal. Different insert manufacturers use different lengths, outside diameters, knurl profiles, flange shapes, and installation recommendations. Always confirm the actual insert datasheet before finalizing the printed hole depth.
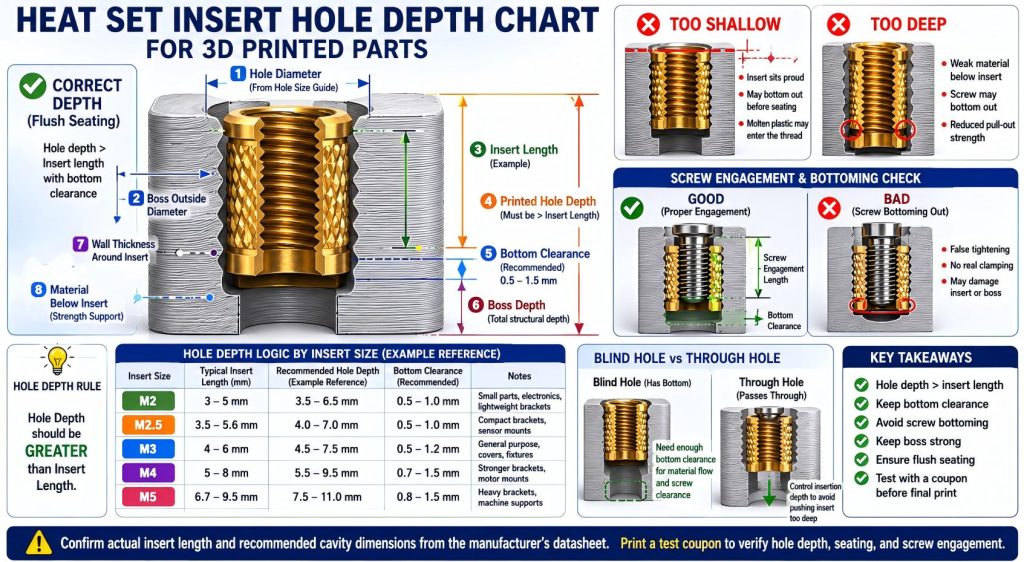
What Hole Depth Means for Heat Set Inserts
Hole depth is the vertical distance available for the heat set insert to enter the printed boss or printed wall. In a blind hole, this depth controls whether the insert can fully seat without bottoming out. In a through hole, depth is less about the physical bottom of the hole and more about whether the insert has enough surrounding material for support.
For heat set insert design, hole depth is related to several dimensions:
- insert length
- boss depth
- remaining plastic below the insert
- screw engagement length
- clearance below the screw tip
- material displaced during heat insertion
- whether the insert should sit flush, below flush, or proud
The hole should be deep enough for the insert to seat fully, but the surrounding printed structure must still remain strong enough to carry the load.
Basic Hole Depth Rule
A practical starting rule is:
Heat set insert hole depth should usually be greater than the insert length.
This extra depth helps prevent the insert from bottoming out before it reaches the intended seating position. It also provides room for small print tolerance variation, installation control, and material movement during heat insertion.
However, extra depth is not unlimited. If the hole is too deep, the boss may lose support below the insert, or a screw may bottom out in the cavity if the screw length is not checked.
For a deeper explanation of screw length and bottoming behavior, see Screw Engagement Length for Heat Set Inserts in 3D Printed Parts.
Typical Heat Set Insert Hole Depth Chart
The following chart gives example hole depth logic for common insert sizes. These are not universal dimensions. They are reference ranges for understanding how insert length, boss depth, and hole depth relate in 3D printed parts.
| Insert Size | Typical Insert Length Range | Practical Hole Depth Logic | Common Use Case |
|---|---|---|---|
| M2 | Often around 3-5 mm | Hole depth should allow full insert seating, with small clearance below the insert. | Small electronics, compact covers, lightweight brackets |
| M2.5 | Often around 3.5-5.6 mm | Hole depth should exceed insert length while preserving enough boss material below. | Sensor mounts, compact brackets, small service panels |
| M3 | Often around 4-6 mm | Hole depth should support full seating and adequate screw engagement without bottoming. | General 3D printed assemblies, covers, fixtures |
| M4 | Often around 5-8 mm | Hole depth should account for larger insert length, plastic displacement, and structural boss support. | Fixtures, motor mounts, brackets, stronger service panels |
| M5 | Often around 6.7-9.5 mm | Hole depth should support full seating, high clamp load, and enough plastic below or around the insert. | Larger fixtures, machine supports, heavy brackets |
For size-specific references, see M2 Heat Set Insert Dimensions Reference for 3D Printed Parts, M2.5 Heat Set Insert Dimensions Reference for 3D Printed Parts, M3 Heat Set Insert Dimensions Reference, M4 Heat Set Insert Dimensions Reference for 3D Printed Parts, and M5 Heat Set Insert Dimensions Reference for 3D Printed Parts.
Hole Depth vs Insert Length
Insert length is the physical length of the metal insert. Hole depth is the printed space available for that insert to enter the part. These two dimensions should not be treated as the same number.
If the hole depth equals the insert length exactly, several problems can occur:
- the insert may bottom out before it becomes flush
- molten plastic may be trapped below the insert
- plastic may flow into the internal thread
- the insert may sit proud of the printed surface
- the screw may later bottom out in the cavity
A small amount of additional depth is often useful. The exact amount depends on the insert style, screw length, boss geometry, and whether the hole is blind or through.
Boss Depth vs Hole Depth
Boss depth is the total available printed structure around and below the insert. Hole depth is the cavity that receives the insert. These are related, but they are not identical.
A good boss should provide:
- enough depth for the full insert length
- enough material below the insert if the hole is blind
- enough wall thickness around the insert
- enough support for screw tightening and pull-out load
- enough clearance so the screw does not bottom out
If the boss is only deep enough for the insert itself, there may not be enough structural material to support the joint. Larger inserts such as M4 and M5 usually need more boss depth and more surrounding material than small inserts.
For boss geometry principles, see How to Design Bosses for Heat Set Inserts.
Blind Holes and Through Holes
Hole depth behaves differently in blind holes and through holes.
Blind Holes
A blind hole has a bottom. This means the insert can bottom out if the hole is too shallow. Blind holes need careful control of:
- insert length
- hole depth
- plastic displacement below the insert
- screw length
- bottom clearance
Blind holes are useful when the insert should not pass through the part, but they are more sensitive to depth errors.
Through Holes
A through hole passes through the printed part. Through holes reduce bottoming risk during insert installation, but they can create other problems:
- the insert may be pushed too deep
- plastic may exit below the boss
- the screw may protrude through the part
- the bottom of the insert may not be supported
- the exposed screw or insert may interfere with nearby components
Through holes can be useful in thicker parts, but the installation depth still needs to be controlled.
Flush Inserts and Proud Inserts
Many heat set insert designs aim for the insert to sit flush with the printed surface. A flush insert gives a clean seating surface for the mating part and reduces interference during assembly.
If the hole is too shallow or the insert bottoms out, the insert may sit proud of the surface. A proud insert can cause:
- poor mating surface contact
- tilted covers or brackets
- uneven screw preload
- false tightening feel
- local stress around the insert
If the insert is pushed too deep, the screw may not engage as expected, or the mating part may deform around the screw hole during tightening.
Screw Bottoming and False Tightening
Hole depth must be checked together with screw length. A screw can feel tight even when the joint is not properly clamped if the screw bottoms out inside the insert or below the insert cavity.
This can create a false tightening condition where:
- the screw feels tight
- the mating part is not fully clamped
- preload is lower than expected
- the insert may be pushed upward
- the boss may crack or deform
This is especially important in repeated assembly, service covers, fixtures, and vibration-loaded parts.
For repeated assembly behavior, see Heat Set Inserts for Repeated Assembly in 3D Printed Parts.
Hole Depth and Pull-Out Strength
Hole depth can affect pull-out strength because it controls how much of the insert is supported by surrounding plastic. If the insert is not fully seated, part of the knurled surface may not be properly embedded in the material.
Pull-out strength depends on:
- insert length
- insert outside diameter
- knurl geometry
- printed hole size
- boss depth
- boss wall thickness
- material behavior
- installation quality
A deeper hole does not automatically increase pull-out strength. The insert must be seated correctly, and the surrounding printed structure must be strong enough to carry the load.
For deeper engineering background, see Pull-Out Strength of Heat Set Inserts in 3D Printed Parts.
Hole Depth and Torque Resistance
Torque resistance depends on how well the insert is locked into the surrounding plastic. If the hole is too shallow, the insert may not fully seat. If the hole is too large or too deep without good wall support, the knurls may not develop enough resistance against rotation.
Torque resistance is especially important when screws are tightened repeatedly or when the joint must resist vibration.
For deeper engineering background, see Torque Resistance of Heat Set Inserts in 3D Printed Parts.
Material Behavior and Hole Depth
Different 3D printing materials respond differently during heat insert installation. The same hole depth may not behave the same way in PLA, PETG, ABS, nylon, or carbon fiber nylon.
PLA is stiff and may hold dimension well, but it can crack if the insert is forced into a tight or shallow hole. PETG is tougher, but it can deform and creep under sustained screw preload. ABS can tolerate installation heat better than PLA, but still depends on proper hole fit and boss geometry. Nylon and carbon fiber nylon may provide better toughness, but printed tolerance, moisture behavior, and local stress concentration still matter.
For material comparison, see PLA vs PETG vs ABS for Threaded Inserts.
Recommended Hole Depth Design Checks
Before finalizing heat set insert hole depth in a 3D printed part, check the following:
- Confirm the actual insert length from the manufacturer datasheet.
- Check whether the hole is blind or through.
- Make the hole deep enough for full insert seating.
- Keep enough material below the insert if the hole is blind.
- Check screw length and thread engagement.
- Confirm the screw does not bottom out below the insert.
- Check that the insert will sit flush if flush seating is required.
- Check boss wall thickness around the insert.
- Print a test coupon before committing to the final design.
- Test insertion depth, screw tightening, and clamp behavior after cooling.
For general hole sizing principles, see the Heat Set Insert Hole Size Guide.
Common Hole Depth Mistakes
Hole Too Shallow
If the hole is too shallow, the insert may bottom out before seating correctly. This can leave the insert proud of the surface or push molten plastic into the internal thread.
No Clearance Below the Insert
If there is no space below the insert in a blind hole, displaced plastic may have nowhere to go. This can affect seating depth and thread cleanliness.
Screw Too Long for the Hole
If the screw is too long, it may bottom out below the insert and create false tightening instead of real clamping.
Hole Too Deep in a Weak Boss
If the hole is too deep and removes too much material below the insert, the boss may become weak under pull-out or tightening load.
Using One Depth for Every Insert Style
Different insert styles have different lengths, pilot shapes, flange shapes, and installation requirements. A hole depth that works for one M3 insert may not work for another M3 insert from a different supplier.
No Test Coupon
Hole depth errors are easier to detect with a small test coupon than in a finished part. A coupon can reveal whether the insert sits proud, sinks too deep, blocks threads, or causes bottoming.
Practical Summary
Heat set insert hole depth should be designed around the actual insert length, boss depth, screw engagement, and surrounding printed structure. The hole should allow the insert to seat fully, but the boss must still retain enough material to support pull-out, torque, and screw preload.
For blind holes, hole depth must prevent insert bottoming and screw bottoming. For through holes, installation depth must still be controlled so the insert does not sit too deep or interfere with nearby components.
A good heat set insert hole depth design is not just a deeper cavity. It is a balance between insert seating, screw engagement, plastic support, boss strength, and long-term fastening reliability.
FAQ
How deep should a heat set insert hole be?
The hole should usually be deeper than the insert length so the insert can fully seat without bottoming out. The exact depth depends on insert length, insert style, screw length, boss geometry, and supplier recommendations.
Should the hole depth equal the insert length?
Usually no. If the hole depth equals the insert length exactly, the insert may bottom out before seating properly. A small amount of additional depth is often needed, especially in blind holes.
Can a heat set insert hole be too deep?
Yes. A hole that is too deep can reduce material below the insert, weaken the boss, or allow the screw to bottom out in the cavity if screw length is not checked.
What happens if the insert sits proud of the surface?
A proud insert can prevent the mating part from seating flat, create uneven preload, and cause local stress around the fastener. It usually means the insert did not seat correctly or the hole was too shallow.
Does hole depth affect pull-out strength?
Yes. If the insert is not fully seated, the knurled surface may not be fully supported by plastic. However, simply making the hole deeper does not increase strength unless boss geometry and material support are also adequate.
Should I test hole depth before printing the final part?
Yes. A test coupon helps verify insert seating depth, installation temperature, screw engagement, and whether the screw bottoms out before the final part is printed.
Related Guides
- M2 Heat Set Insert Dimensions Reference for 3D Printed Parts
- M2.5 Heat Set Insert Dimensions Reference for 3D Printed Parts
- M3 Heat Set Insert Dimensions Reference
- M4 Heat Set Insert Dimensions Reference for 3D Printed Parts
- M5 Heat Set Insert Dimensions Reference for 3D Printed Parts
- Heat Set Insert Hole Size Guide
- How to Design Bosses for Heat Set Inserts
- Screw Engagement Length for Heat Set Inserts in 3D Printed Parts
Source Notes
Example hole depth values and insert length ranges vary by supplier, insert style, and installation method. Always confirm the specific datasheet for the insert being used before finalizing a production design.
Related Decision Resources
For insert selection, tool choice, and supplier comparison, use these decision-focused references after the engineering requirements are defined.