
M2 heat set insert hole size for 3D printed parts depends on the insert’s outer diameter, knurl shape, material, print tolerance, boss wall thickness, hole depth, and how much heat can be controlled during installation.
M2 inserts are small, so their design margin is much tighter than larger insert sizes such as M3, M4, or M5. A small change in printed hole diameter, wall thickness, or insertion temperature can have a noticeable effect on whether the insert seats correctly, cracks the boss, spins under screw torque, or pulls out during use.
This guide explains how to think about M2 heat set insert hole size in 3D printed parts without treating one generic number as universal. Always start with the insert manufacturer’s drawing, then validate the hole size with your printer, material, and boss geometry.
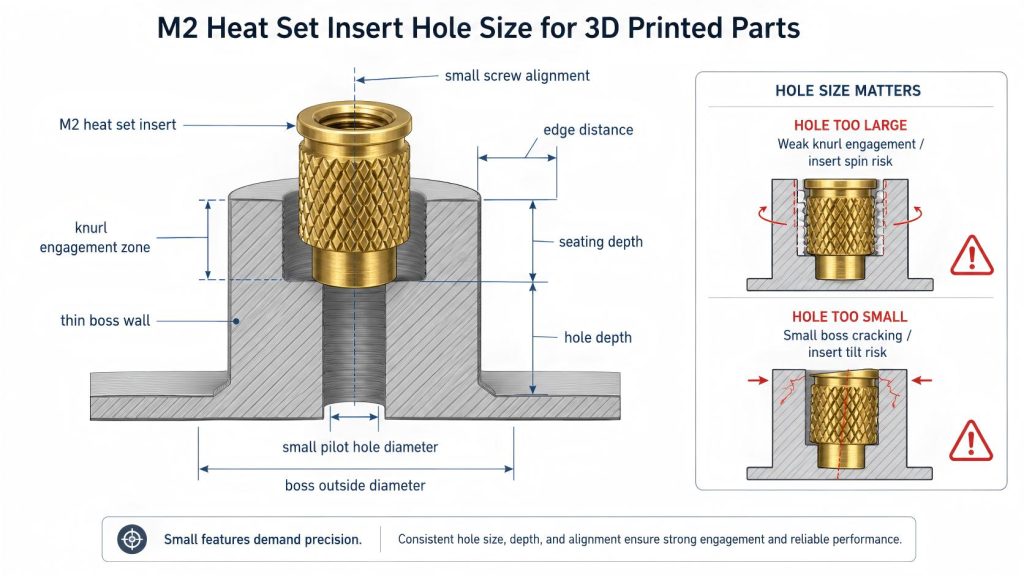
What Is the Recommended Hole Size for an M2 Heat Set Insert?
There is no single universal hole size for every M2 heat set insert because insert outer diameters vary by manufacturer, insert length, knurl pattern, and flange style.
The correct starting point is the manufacturer’s recommended pilot hole diameter for the exact M2 insert being used. In a 3D printed part, the pilot hole is usually designed slightly smaller than the insert’s outer knurled diameter so the heated insert can displace softened plastic and form mechanical engagement around the knurl features.
For M2 inserts, the tolerance window is narrow. A hole that is only slightly too large may reduce grip. A hole that is slightly too small may crack a small boss or make the insert tilt during installation.
Why M2 Hole Size Needs Special Care
M2 heat set inserts are often used in small electronics housings, compact covers, sensor mounts, lightweight brackets, RC parts, drone components, and thin printed assemblies. These parts often have limited wall thickness and very little room around the insert.
Because M2 bosses are small, the hole size must balance several risks:
- The insert must have enough plastic engagement to resist screw torque.
- The boss must not crack during heat insertion.
- The insert must remain aligned with the small screw axis.
- The hole must be deep enough for proper seating.
- The screw must have enough usable thread engagement.
- The surrounding wall must be thick enough to support the insert.
Small insert size does not mean the design is easier. In many cases, M2 insert joints are less forgiving because there is less surrounding material available to absorb error.
Key Variables That Affect M2 Heat Set Insert Hole Size
| Variable | Why It Matters |
|---|---|
| Insert outer diameter | The knurled diameter controls the basic pilot hole range. |
| Insert length | Short M2 inserts have limited engagement area and require careful seating. |
| Knurl geometry | Fine or aggressive knurls need enough softened plastic to lock in place. |
| Printed material | PLA, PETG, ABS, ASA, nylon, and resin-like materials respond differently to heat and stress. |
| Boss wall thickness | Small bosses can crack easily if the wall is too thin or the hole is too tight. |
| Hole depth | Shallow holes may cause proud inserts, bottoming, or poor screw engagement. |
| Print tolerance | Small printed holes often come out undersized, oval, or partially closed. |
| Insertion temperature | Too much heat can over-soften the tiny boss; too little heat increases insertion force. |
| Screw torque | M2 screws use low torque, but the small insert can still spin if engagement is weak. |
M2 Hole Size Is a Precision Feature
For M2 inserts, the pilot hole should be treated as a precision feature. Printed hole accuracy matters more because the hole is small relative to nozzle size, layer height, and printer tolerance.
Common 3D printing effects that matter more for M2 holes include:
- Small holes printing undersized
- Hole ovality caused by printer calibration or material shrinkage
- Over-extrusion partially closing the pilot hole
- Layer seams affecting the hole wall
- Thin bosses softening too quickly during heat insertion
- Limited room for displaced plastic
For this reason, M2 insert holes should be tested in the same material and print settings as the final part. A hole that works in one printer profile may not work in another.
Hole Too Large: Common M2 Insert Problems
If the M2 pilot hole is too large, the insert may enter easily but fail to develop enough grip after cooling. Because the insert is small, there is less contact area available to recover from poor knurl engagement.
Possible oversized-hole symptoms include:
- The insert drops in with little resistance.
- The insert spins when the screw is tightened.
- The screw feels tight at first but loosens quickly.
- The insert can be pulled out with light force.
- The plastic does not appear to flow around the knurl pattern.
- The joint feels weak after only a few screw cycles.
For M2 parts, an oversized hole may not show dramatic failure immediately. The joint may simply feel soft, loose, or unreliable during assembly.
Hole Too Small: Common M2 Insert Problems
If the M2 pilot hole is too small, the insert may require too much force to install. Small bosses do not have much plastic around the hole, so excessive insertion pressure can split the boss or deform the part.
Possible undersized-hole symptoms include:
- The boss cracks during installation.
- The insert tilts instead of seating straight.
- The insert stops before reaching full depth.
- Plastic bulges around the top of the hole.
- The part wall deforms near the insert.
- The screw does not align cleanly with the insert thread.
This risk is especially important in PLA, thin-wall housings, small tabs, and parts printed with limited perimeter count.
Material Considerations for M2 Heat Set Insert Holes
PLA
PLA can print small holes sharply, but it is less forgiving when the hole is too tight or the boss wall is thin. M2 inserts in PLA should be installed with controlled heat and light pressure to reduce cracking risk.
PETG
PETG is more ductile than PLA, which may help during insertion, but it can also soften and deform around tiny bosses if overheated. M2 holes in PETG should be validated for both installation fit and repeated screw use.
ABS and ASA
ABS and ASA can tolerate heat better than PLA and PETG, but small M2 bosses still depend on print quality, layer adhesion, and hole accuracy. Warping or poor layer bonding can reduce insert reliability.
Nylon and Filled Materials
Nylon and fiber-filled materials may behave differently depending on moisture, fiber content, and print settings. M2 inserts in these materials should be test-fitted because small hole geometry can be affected by fiber-filled extrusion behavior and surface texture.
Blind Holes vs Through Holes for M2 Inserts
M2 heat set inserts are often used in compact parts where hole depth is limited. Blind holes can work well, but they must be deep enough for the insert length and displaced plastic.
If the blind hole is too shallow, the insert may bottom out before seating properly. This can leave the insert proud of the surface or reduce usable screw engagement.
Through holes can reduce bottoming risk, but they may allow the insert to sink too far if installation is not controlled. For small parts, either approach must be validated with a test print.
Boss Geometry Around M2 Heat Set Insert Holes
The small size of M2 inserts makes boss geometry especially important. A small pilot hole surrounded by thin material can crack or deform quickly during insertion.
Review the following before finalizing the hole size:
- Is there enough wall thickness around the insert?
- Is the insert too close to an edge, slot, thin wall, or corner?
- Is the boss tall enough for the insert length?
- Will the screw be removed and reinstalled often?
- Is the part wall thick enough to support the boss?
- Will the insert be loaded in pull-out, shear, or vibration?
If the boss is too small, changing the hole diameter alone will not create a reliable insert joint.
Recommended Design Process for M2 Pilot Holes
- Start with the exact insert manufacturer’s pilot hole recommendation.
- Check the insert’s outer knurled diameter and length.
- Confirm whether the printed hole comes out undersized on your printer.
- Print a small test boss in the same material and orientation as the final part.
- Install the insert with controlled heat and low vertical pressure.
- Check whether the insert seats flush, remains aligned, and resists light screw torque.
- Check for boss cracking, plastic bulging, or tilt.
- Adjust the CAD hole based on the printed result, not only the nominal model size.
- Validate screw engagement and repeated assembly if the part will be serviced.
When to Choose M2 Instead of M3
M2 inserts may be appropriate when the printed part is small, the screw load is light, and there is not enough space for an M3 boss. They are commonly used in compact electronics, small covers, sensor modules, light brackets, RC components, and small mechanical assemblies.
M2 is useful when:
- The part is too small for M3 boss geometry.
- The screw load is low.
- The assembly needs small removable screws.
- The part is a compact enclosure or cover.
- Weight and space are limited.
- The surrounding boss can still be printed cleanly.
However, M2 should not be chosen if the part needs high torque, high pull-out strength, or repeated heavy service. In those cases, M3 or a different fastening method may be more reliable.
Common Mistakes With M2 Heat Set Insert Hole Size
- Using a generic M2 hole size without checking the insert drawing.
- Assuming all M2 heat set inserts have the same outer diameter.
- Ignoring that small printed holes often print undersized.
- Overheating a small boss during installation.
- Using too much insertion force in PLA.
- Placing the insert too close to a thin edge or corner.
- Using a blind hole that is too shallow.
- Testing only fit, but not screw torque or repeated removal.
- Choosing M2 for a load that really needs a larger fastener.
Related Engineering Guides
- Heat Set Insert Hole Size Guide
- M3 Heat Set Insert Hole Size for 3D Printed Parts
- M4 Heat Set Insert Hole Size for 3D Printed Parts
- How to Design Bosses for Heat Set Inserts
- PLA vs PETG vs ABS for Threaded Inserts
- Screw Engagement Length for Heat Set Inserts in 3D Printed Parts
Related Engineering References
- M2 Heat Set Insert Dimensions Reference for 3D Printed Parts
- Heat Set Insert Hole Depth Chart for 3D Printed Parts
- Heat Set Insert Pilot Hole Tolerance Reference for 3D Printed Parts
- Heat Set Insert Minimum Wall Thickness Reference for 3D Printed Parts
- Heat Set Insert Seating Depth Reference for 3D Printed Parts
Conclusion
M2 heat set insert hole size should be selected from the exact insert drawing, then validated with the printed material, printer tolerance, and boss geometry used in the real part. Because M2 inserts are small, the margin for hole size, heat control, alignment, and wall thickness is narrow.
For small 3D printed parts, the safest approach is to treat the M2 pilot hole as a precision fastening feature rather than a simple small hole in the model.
Related Decision Resources
For insert selection, tool choice, and supplier comparison, use these decision-focused references after the engineering requirements are defined.