
Heat Set Inserts for 3D Printed Limit Switch Mounts are used when a small mechanical switch, microswitch, roller switch, or endstop sensor must remain fixed, aligned, and repeatable after many actuation cycles. In motion systems, robotics, printer assemblies, CNC accessories, test fixtures, and small automation devices, the limit switch may be small, but its mounting accuracy can affect the reliability of the entire mechanism.
A limit switch mount is not usually a high-load structural bracket. Its real engineering problem is position stability. The switch must stay in the same place after repeated contact, vibration, adjustment, screw removal, and small impact loads from the moving actuator.
Heat set inserts can make a printed limit switch mount more serviceable and more stable, but only if the insert is supported by enough printed material. A brass insert does not automatically prevent trigger drift, boss cracking, insert spin, or bracket flexing. The printed geometry around the insert still controls the real behavior of the switch mount.
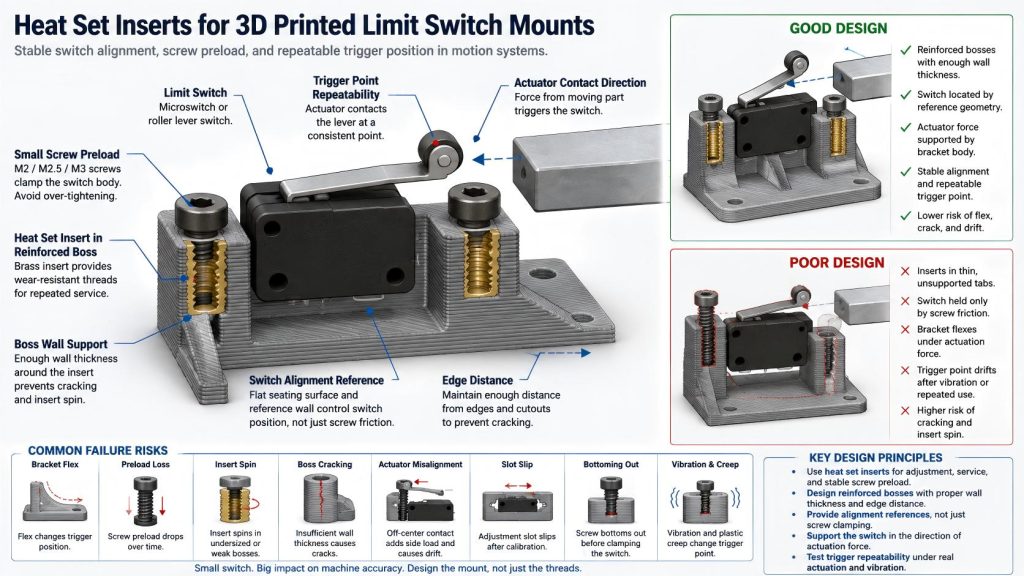
Why Limit Switch Mounts Need Stable Fastening
A limit switch is often used to define a home position, travel limit, safety stop, or repeatable trigger point. In a 3D printed machine assembly, the switch may be mounted with small M2, M2.5, or M3 screws. These screws may be removed during maintenance, loosened during adjustment, or exposed to vibration from moving parts.
If the switch is threaded directly into plastic, the threads can wear after repeated service. If the switch is clamped against a flexible printed bracket, the switch body may shift even when the screw still feels tight. If the insert boss is too small, the insert may spin or crack the printed boss during tightening.
The goal is not only to hold the switch. The goal is to keep the trigger position repeatable.
Common Use Cases
3D printed limit switch mounts appear in many compact motion systems where a moving part must contact a switch at a predictable point.
- 3D printer endstop switch brackets
- CNC axis limit switch mounts
- robot joint home position switches
- linear slide position feedback mounts
- small automation actuator stop switches
- fixture travel confirmation switches
- microswitch brackets for test rigs
- roller lever switch mounts
- optical or mechanical endstop board mounts
- adjustable switch brackets for calibration
For related motion applications, see Heat Set Inserts for 3D Printed Linear Rail End Stops and Heat Set Inserts for Adjustable Camera and Sensor Mounts.
How Limit Switch Loads Affect Heat Set Inserts
The loads on a limit switch mount are usually small, but they are repeated. A switch may be contacted hundreds or thousands of times. Each contact can apply a small force through the switch body into the printed bracket and the insert bosses.
Common load types include:
- actuator contact force on the switch lever or button
- repeated triggering of a microswitch
- vibration from a moving axis or motor
- small side load from misaligned contact
- screw preload holding the switch body down
- adjustment cycles during calibration
- switch removal and reinstallation during service
- plastic creep under sustained clamp load
Even when these forces are small, they can create position drift if the printed bracket is thin, the boss is unsupported, or the switch is held only by screw friction.
Insert Placement in Limit Switch Mounts
Insert placement should follow the direction of actuation. If the moving part presses the switch from one side, the printed structure should resist that force without bending or allowing the switch body to rotate.
A common mistake is placing small inserts in thin printed ears on both sides of the switch. This may look clean, but the ears can flex, crack, or slowly deform under repeated screw preload and switch contact force.
Good insert placement usually means:
- placing inserts in reinforced bosses instead of thin tabs
- keeping enough wall thickness around the insert hole
- avoiding inserts too close to edges or corners
- adding ribs between the switch mounting area and the bracket body
- supporting the switch against the direction of actuation
- using a flat switch seating surface
- keeping the insert axis aligned with the screw axis
For geometry limits, see Heat Set Insert Edge Distance Reference for 3D Printed Parts and Heat Set Insert Minimum Wall Thickness Reference for 3D Printed Parts.
Switch Alignment Matters More Than Strength Alone
In many brackets, the main question is whether the insert can resist pull-out or tightening torque. In a limit switch mount, the more important question is often whether the switch stays aligned.
A strong insert in a flexible printed bracket can still produce unreliable triggering. If the bracket bends, the switch may trigger early, late, or inconsistently. If the switch is mounted on a thin unsupported wall, the screw may remain tight while the wall slowly creeps or shifts.
The switch should be located by geometry wherever possible. A small shoulder, reference wall, pocket, or locating surface can help keep the switch in position. The screw and insert should provide clamping force, while the printed reference geometry controls alignment.
Mounting Inserts vs Adjustment Inserts
Limit switch mounts may use inserts for different purposes. Some inserts hold the switch body. Others hold an adjustable trigger screw, striker plate, or bracket mounting screw.
| Insert Role | Main Load | Design Priority |
|---|---|---|
| Switch mounting insert | Screw preload holding the switch body | Maintain switch alignment and prevent thread wear. |
| Bracket mounting insert | Fastening the switch bracket to a frame or printed structure | Prevent bracket shift, loosening, and boss cracking. |
| Adjustment screw insert | Repeated screw turning during calibration | Maintain thread durability and stable trigger position. |
| Actuator striker insert | Small repeated contact force | Prevent drift from impact, vibration, or screw loosening. |
Each insert role may need different boss support, screw engagement, torque control, and material choice.
Small Screws and Preload Loss
Limit switches often use small screws. Small screws are easy to overtighten, and small insert bosses are easy to damage. A screw that feels tight during assembly may not maintain useful preload after vibration, plastic relaxation, or repeated switch contact.
In PETG, nylon, or other materials that can creep under sustained load, the switch may slowly lose clamping force. This can lead to trigger point drift even if the insert does not pull out.
Good practice includes:
- using enough screw engagement without bottoming out
- avoiding excessive tightening torque
- checking the final assembly stack-up
- using washers when clamp area is too small
- supporting the switch body with a locating feature
- testing switch position after repeated actuation
For screw engagement behavior, see Screw Engagement Length for Heat Set Inserts in 3D Printed Parts. For tightening guidance, see Heat Set Insert Torque Range Reference for 3D Printed Parts.
Adjustable Limit Switch Mounts
Some limit switch mounts use slots so the switch can be moved during calibration. This is useful, but it changes the fastening problem.
When a switch is clamped through a slot, the joint depends heavily on friction between the switch body and the printed surface. If the surface compresses, creeps, or vibrates loose, the switch may slide slightly. A small shift may be enough to change the trigger point.
For adjustable switch mounts:
- use a wide enough clamp area under the screw head or washer
- avoid narrow printed slots that can crush under preload
- add a reference edge if repeatable position matters
- avoid relying only on screw friction
- use inserts if the switch will be adjusted many times
- keep the adjustment direction aligned with the expected trigger force
If accurate repeatability is required, the printed part should include a locating surface, not just a long slot.
Boss Design for Limit Switch Inserts
The boss around the insert should be treated as part of the positioning structure. If the boss moves, bends, cracks, or relaxes, the switch position can change.
Useful boss design features include:
- large enough boss outside diameter
- adequate wall thickness around the insert body
- short load path from the boss to the bracket body
- ribs behind the switch mounting area
- fillets at boss-to-wall transitions
- flat seating surface under the switch body
- enough insert depth without bottoming the screw
- print orientation that avoids splitting along layer lines
For boss design, see How to Design Bosses for Heat Set Inserts and Boss OD Ratio for Heat Set Inserts in 3D Printed Parts.
Material Considerations
Material choice affects switch alignment, screw preload, and long-term stability. The best material is not always the strongest material on paper. The printed geometry, layer adhesion, heat exposure, and preload behavior matter together.
| Material | Limit Switch Mount Behavior | Insert Design Note |
|---|---|---|
| PLA | Stiff and dimensionally stable at room temperature, but brittle around small bosses | Avoid tight insert holes, thin tabs, and overheated installation. |
| PETG | Tougher than PLA, but may relax under sustained screw preload | Check for switch drift after repeated actuation and vibration. |
| ABS | Useful for functional brackets with better temperature tolerance | Check layer adhesion and boss support around small inserts. |
| ASA | Good for exposed or machine-adjacent brackets | Maintain edge distance and avoid unsupported switch ears. |
| Nylon | Tough and impact-tolerant, but may creep under preload | Use locating geometry so switch position does not rely only on clamp friction. |
| Fiber-filled materials | Stiff and dimensionally stable, but can crack if geometry is too thin | Use generous boss support and avoid sharp stress paths near inserts. |
For material comparison, see PLA vs PETG vs ABS for Threaded Inserts.
Common Failure Modes
Limit switch mounts often fail quietly. The insert may not pull out completely, but the switch position may become unreliable.
- switch body shifts after repeated actuation
- trigger point changes after vibration
- insert spins during screw tightening
- small boss cracks around M2 or M2.5 inserts
- printed switch ears flex under contact force
- screw preload drops over time
- slot adjustment slips after calibration
- screw bottoms out before clamping the switch
- switch bracket cracks along layer lines
- actuator hits the switch off-center and twists the mount
For related failure explanations, see Why Do Heat Set Inserts Fail in Sensor Brackets?, Why Do Heat Set Inserts Fail Under Vibration?, and Why Does Screw Preload Drop in 3D Printed Insert Joints?.
Testing a 3D Printed Limit Switch Mount
A limit switch mount should be tested for repeatability, not only for whether the screws tighten successfully. The real question is whether the switch triggers at the same point after use.
A useful test should include:
- installing the inserts in the final print orientation
- assembling the switch with the real screws and washers
- checking whether screws bottom out before clamping
- triggering the switch repeatedly with the real actuator
- checking switch position after vibration or machine motion
- loosening and retightening the switch during calibration
- checking whether the insert spins or rises
- inspecting bosses, tabs, and layer lines for cracks
- measuring whether the trigger point has shifted
Design Checklist
- Use heat set inserts when the switch will be adjusted, removed, or serviced.
- Place inserts in reinforced bosses, not thin unsupported switch ears.
- Keep inserts away from weak edges, corners, and narrow tabs.
- Add locating geometry so switch position does not rely only on screw friction.
- Reinforce the bracket in the direction of switch actuation force.
- Use enough screw engagement without bottoming out.
- Avoid overtightening small screws in small bosses.
- Check preload loss in PETG, nylon, and other creep-prone materials.
- Test the switch under real actuation and vibration conditions.
Related Engineering Guides
- How to Choose Heat Set Inserts for 3D Printed Parts
- Heat Set Insert Hole Size Guide
- How to Design Bosses for Heat Set Inserts
- Torque Resistance of Heat Set Inserts in 3D Printed Parts
- Screw Engagement Length for Heat Set Inserts in 3D Printed Parts
- PLA vs PETG vs ABS for Threaded Inserts
Related Applications
- Heat Set Inserts for 3D Printed Linear Rail End Stops
- Heat Set Inserts for Adjustable Camera and Sensor Mounts
- Heat Set Inserts in Sensor Brackets
- Heat Set Inserts for High-Vibration Motor Mounting Brackets
FAQ
Are heat set inserts necessary for 3D printed limit switch mounts?
They are not always necessary for simple prototypes, but they are recommended when the switch needs adjustment, repeated service, stable screw preload, or reliable trigger position over time.
What is the main failure risk in a limit switch mount?
The main risk is usually not complete insert pull-out. It is small positional drift caused by preload loss, vibration, plastic creep, weak boss geometry, bracket flex, or poor switch alignment.
Should a limit switch position rely only on screw friction?
No, not when repeatability matters. A locating shoulder, pocket, reference edge, or stop surface should help control switch position. The screw and insert should provide clamping force, not the only alignment feature.
Which insert size is common for limit switch mounts?
M2, M2.5, and M3 inserts are common because many limit switches and sensor modules use small screws. The correct size depends on switch hole size, available boss diameter, wall thickness, and required preload.
Why does a limit switch shift even when the screw feels tight?
The screw may feel tight while the printed surface slowly creeps, the bracket flexes, the slot slips, or the screw bottoms out before creating real clamp force. Trigger repeatability depends on the full printed structure, not only the insert thread.